Website Post

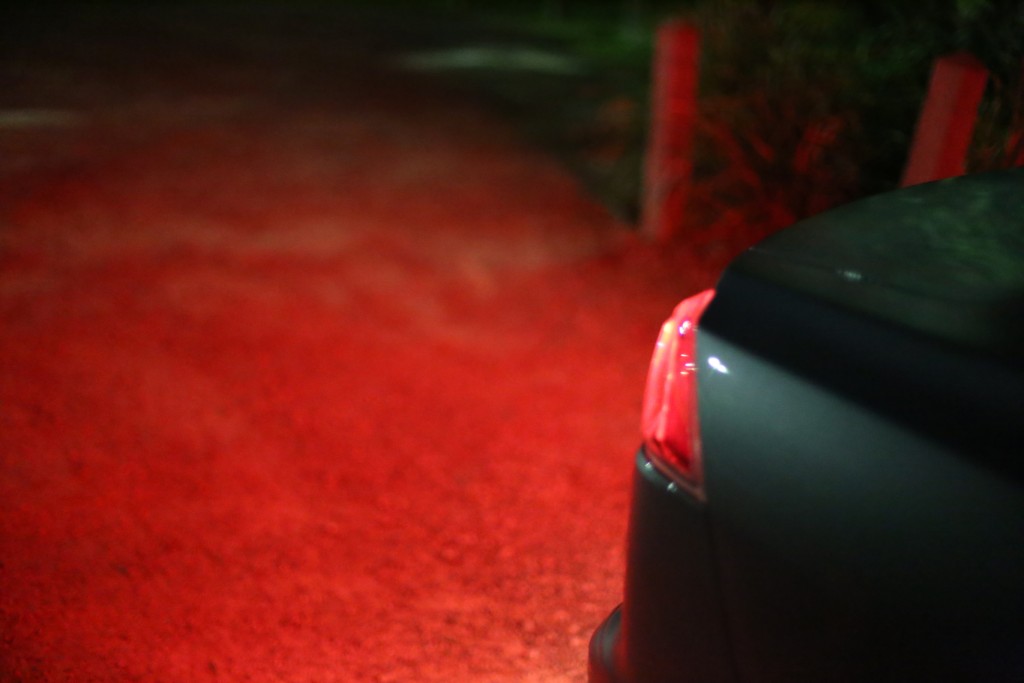
IMG_1816

This semester I have been focusing on shooting at night. After shooting some photographic tests (see one above), I decided I wanted to focus on only using available light sources, such as a street lamp or car headlights etc. My aim for the rest of the semester was to create a series of short scenes for each of the my tests, but as I started to plan my schedule, this seemed very unrealistic, and would leave very little time to do experiments. I then decided that I wanted to focus on a concept I developed on two of my photographic tests (below).

IMG_1723 IMG_1720

Because I am sort of drawn to crime, I wanted this to be a scene that involved crime. For just a quick scene, I decided to keep the narrative simple so I could focus mainly on the visuals. The concept is just a man pulling his car over and opening the boot, revealing the screams of a girl within. He then removes her from the car and drags her to the front of the car and attacks her.

In some of my investigations with lighting, I used red gels to create a violent/aggressive mood, but with this concept, instead of using red gels, I decided to use the “available” light from the taillights of a car (below), shown when the victim is taken out of the boot.

IMG_1717

I started working on a storyboard, that were initially sketches, but I then went out and took a photographic storyboard. This gave me a better idea of framing and style. I then started filming some tests, comparing lighting and movement both on my Canon 6D and the school’s EX3 camera. Unable to come to a clear decesion on which camera I wanted to film my final scene on, I did a shoot on both. After starting to shoot with the 6D, I quickly began to realise that the shots were not very well lit with just available lighting, so I rushed through the shoot just to get the bare minimum of shots so I could edit them and explain why shooting on the 6D wasn’t ideal for this project. When we shot on the EX3, I had a new perspective, because it seemed like such a difference. The shots were easier to see with the same lighting, and the quality was incredible. When I got to the edit suites the footage was clear and had all the information needed to edit.

Movement test:

https://www.youtube.com/watch?v=pM9yfaoZ7FM

Test of scene:

Film scene:

https://www.youtube.com/watch?v=Tcx1mkbdGAY

Screener:

Colour Grading

https://www.youtube.com/watch?v=2cMGnTrYkbs

First: Original ungraded

Second: I made the clip cyan with mid-tones and highlights, and saturated it quite a bit. I wanted to experiment with saturation, because I have never really used a high saturation before, because I personally do not like the look it gives, and after this experiment I am sure I don’t like it. The colours are too rich and unrealistic, although this could work if I wanted to do something dreamlike and non realistic.

Third: Cyan mid-tones and highlights, except with a low saturation. I prefer this over the high saturated image, as it gives the scene a visually chilling sense because it has such a cold saturation. Although I would prefer it too been less cyan.

Fourth: Red mid-tones and highlights, untouched saturation. This is quite an interesting colour grade for me, because in some of my tests I worked with red gels to achieve a very similar look to this. It almost proves to me that gels are almost unnecessary if you want a shot to be completely red.

Fifth: Completely desaturated. I like this because it gives a sort of film-noir vibe as its used with the shadows on the actors faces.
 

Today I also learnt how to do split screen editing on Premiere. Like most of the things on Premiere, it isn’t difficult to do, but finding where to do it is the hard part.

https://www.youtube.com/watch?v=pM9yfaoZ7FM

TAKE TWO

A few days ago I did another shoot of the same scene except with my own camera, a Canon 6D, and recorded audio with my Zoom H5 Handy Recorder. After doing movement tests for the EX3 and Canon 6D, there were pros and cons for both footage, so I decided it would be a good idea to film the same scene with the same shots (or similar) on both cameras. Although, after opening the footage up on a large screen, there was definitely a noticeable difference between the quality of the EX3 and 6D. The EX3 is better because it has more information, which means that ultimately you can achieve more in post. Even though I may have preferred the look of the 6D footage more in my tests a few weeks ago, the images are too heavily compressed.

some quick screenshots

On set, I was quite nervous about some of the shots being too dark, so dark that they wouldn’t actually show up on a larger screen, but everything is legible so that’s good. Even though I said earlier that I didn’t want to use lighting that isn’t “available” lighting, I’m glad I did, because it helped in some shots.

Screen Shot 2015-10-12 at 1.09.26 pmScreen Shot 2015-10-12 at 1.08.49 pm
These shots were lit by a single Litepanel, because without it, nothing actually showed up on the viewfinder because it was too dark. It doesn’t look unrealistic because he is not lit stylistically, it just gives the shot a bit of a pop. 
Screen Shot 2015-10-12 at 1.10.53 pm
Screen Shot 2015-10-12 at 1.11.42 pmScreen Shot 2015-10-12 at 1.11.56 pm
I think this was quite a spontaneous use of the Litepanel, because it wasn’t necessarily needed, with the backlight coming from the streetlight in the distance, and the key light coming from the tail light of the car and the light from inside of the boot. The Litepanel is given the role of fill light, and has been used to add shadows on the face of the guy, which adds a demonising effect that I really like.
Screen Shot 2015-10-12 at 1.17.00 pmScreen Shot 2015-10-12 at 1.07.54 pm
This was my favourite shot, because the lighting really emphasised the movement in the scene, highlighting the violent scene and the dirt flowing across the frame.
Screen Shot 2015-10-12 at 1.08.22 pm
At the time of shooting this, I was really unhappy with it, because it didn’t turn out much like my tests, because I didn’t have time to properly set up the camera and the framing because it had started to rain. Another thing that initially irked me was the fact that it was raining in this shot, but not in any of the others, but I have actually grown to prefer this. The rain adds a sense of chaos to the drama, and this being just a test, continuity isn’t so much of an important factor than just learning from things.

Editing

So this is my first real go at editing for this project, but it is only quite basic, just using the merged clips and cutting them together. The next step is to add some of the sound effects that Ella recorded on Saturday at the shoot. I also need to do some tests with colour grading. I am quite happy with the footage, but I am still pretty disappointed with how the shoot went, because I knew it was going to rain so we had to rush through it a bit, but I’m glad that I got some of the shots I wanted. I am especially pleased with the lighting in the 3rd shot, I think the dirt that fills the shot works well as it is lit by the headlights, which also gives Elly’s red hair a glow that is really interesting.

Syncing Audio

When I imported my footage into Premiere and was ready to start syncing up the audio from the camera and the audio that Ella took from the h4 Zoom, I realised that there was no audio connected to the footage. I went to Ella to see if I’d made a mistake and it turns out, audio doesn’t automatically record on the EX3. The audio on the camera is set to what the last person set it to, so the last people that used it probably would have used a mixer and connected that to the camera, whereas we just wanted to have some basic audio to sync it up with the audio Ella recorded.

It may have taken longer, but it isn’t that hard to sync up the footage with the audio using markers on Premiere. Some of the audio files were easy to sync up because there were clear sounds, like for example the first shot had a door slam, which showed up quite clearly, so it was easy to visually sync it. Although, this shit shot, there is no dominating sounds, so I had to choose the sound of the boot lock being clicked.

Screen Shot 2015-10-12 at 12.12.50 pm
Screen Shot 2015-10-12 at 12.12.57 pm
When you find the part of the audio you want to link, you click “M” and name the marker, and you name it something like “Boot Open 1” if it is the first take.

Screen Shot 2015-10-12 at 12.12.14 pm Screen Shot 2015-10-12 at 12.12.27 pm
You then do the same to the footage, at the exact point where the sound would be made, in this case, unlocking the boot. When you mark it though, you have to name it the exact title as the audio marker name.

Screen Shot 2015-10-12 at 12.18.02 pm
Then you highlight the audio clip and the visual clip and right click and select “Merge Clips…”
Screen Shot 2015-10-12 at 12.18.11 pm
The clips then merge together and you can put them in a sequence, with the markers automatically syncing up together.
This is the shot that was merged using markers:

Final shoot

About 2 hours before we start to set up, I look at the weather forecast and it says that there is a thunderstorm coming in about 1 hour. As tonight is really the last opportunity to film, I decided to just keep things to schedule and hope it doesn’t rain. To avoid the worst of it, we worked through the shots pretty quickly, and even skipped a few to save time. This wasn’t ideal, since I planned all of my shots and knew what I wanted, but in the moment it was the only thing I could think of doing because I knew that when it started to rain, we had to pack up.

Ella came to record audio, and help with lighting and camera operating. I had 2 people who are friends of mine and really wanted to help out with the project. Elly played the victim and wanted to do this because she used to be in some student short films, and wants to get back into it.

I am so grateful for Ella helping me with this shoot. It was great to have a second opinion on some of the framing and lighting choices, so it made things a lot easier and less stressful as it probably would have been if I was on my own. She had some great ideas and techniques for record some of the audio. We started with audio that would be heard but would not sync up with visuals in a shot, eg the car stopping and feet dragging on gravel. Ella decided the best way to record the car sounds was to actually get into the boot and hang out a bit with the h4 zoom. We did this a few times and it worked out well. For the sounds of feet dragging on gravel, she got Tom (one of the actors) to physically drag her whilst she held the h4 zoom. She used different patches of gravel for more variety in the editing stage.

One thing we forgot to do, in the rush of it all, was record some wild lines and sounds. Everything was so rushed towards the end of the shoot because it started to rain, and I think this might be an issue when getting to editing.

Another regret I have is that during the planning stages, I mostly did photographic tests, and only did 2 video tests. Even though they gave me an idea of the sort of framing and lighting I wanted to work with, it would have been good to do a test of each shot I planned. Maybe if I had more time during this shoot I could have done more tests and run throughs, but because I didn’t consider the shoot cutting short, some video tests prior would have helped a bit I think.

Movement test

Since I have been using photography for most of my tests, focusing mostly on framing and lighting,and not so much on movement, it is important that I experiment with how lighting and movement communicate through film. For these tests, I borrow the EX3 camera from school and also used my own DSLR camera, Canon 6D with a Canon EF 50mm lens.

The blacks from the 6D camera compared to the EX3, are very different. With the DSLR, you cannot see anything in the background, as it is completely submerged in darkness, but with the EX3, you can see some of the background and even the ground in the foreground. Even though the framing is different because I used different focal lengths, the feet are both in frame, whereas you can them much more clearly in the EX3 footage. Although I think could have been different if I changed the exposure, because when I was filming it showed up as quite dark, but obviously now looking at it on a large screen, that is not the case. As I am focusing heavily on lighting during this project, I am glad I did this test because it shows me how the same light can show up different on different cameras. I actually prefer the outcome of the 6D footage as opposed to the EX3, because it has a similar look and vibe to how I was originally hoping for. Although, I do like the glare created in the EX3 footage, as it gives the shot more colour and is quite interesting.

Screen Shot 2015-10-12 at 5.05.42 pm
(Test from EX3)
Screen Shot 2015-10-12 at 5.06.08 pm
(Test from Canon 6D)

These two frames are important because they are almost exact to the shot that is in my storyboard.

Screen-Shot-2015-10-11-at-4.18.16-pm-1f2ajxr-1024x665
I intend for the victim crouched down to be facing the man whilst she has a backlight from the car headlights. Both of the tests show the shot that I want, and I would be happy using either, but I actually prefer the footage from the ex3 in this frame, because there is more light around the head of the girl and it looks quite otherworldly, especially with the colours from the glare.

Collaborating on set

Collaboration is important for any film project, and it is helpful when you share a similar vision with the people you are working with.

Last night Aidan and I helped Ella shoot her first and possibly her final film in her investigations, with both shooting at night and sound design. I think we worked really well as a team, especially since we are all interested in exploring night shooting within this project.

With Ella working with Directing and Audio with a Zoom h4 and shotgun mic, Aidan and I took turns working with camera operating and lighting, using the Sony ex3 and a Litepanel. When it was finally dark, we started to shoot, and almost immediately found that it was incredibly difficult to shoot at night with such minimal light. Since none of us had worked with an ex3 at night, I don’t think any of us really thought about the possibility of light not showing up on camera. We used the Litepanel in every shot, because without it, nothing would be seen in shot. In some of the shots planned, we thought the light from a phone would suffice for lighting in the scene, but we quickly learnt otherwise.

As we all got more comfortable with our techniques in this shoot, setting up a shot got easier and quicker. As Ella wanted this project to be mostly sound design, the visuals were more secondary, but after this shoot I think with the shots that were created, the sound design and visuals will work together incredibly well.

12067825_10153356903664748_969109892_n-1

This experience also helped me get an idea of things that would help with my shoot. I wasn’t considering using a Litepanel, but after seeing how difficult it is to light a scene at night, I might try it in my shoot and do some tests. Even though I will have more lighting in my scene, it could still be a good addition to some shots.